


Want to learn a new hobby?
Give one of these five skills a try

Welcome to another Friday essay. Thanks for reading, thanks for being here, and thanks for making something good in this world. Be well. ~JRC
Look, I get it. Who has the time to start another hobby? But taking up a new skill doesn't mean you have to go all-in as you did on quilting/woodworking/Pleinair painting/underwater welding (or whatever it is you do). Instead, with minimal investment, you can gain a valuable new ability that’s fun. Best of all, it might change - for the better - how you make.
So, without further fuss (or ado, whatever that means), here are five maker experiences worth taking up in your "spare" spare time.
Leathercraft
Making stuff from leather is about as old as humanity itself. It's pretty simple to start - all you need are a few basic tools and some leather, of course. The idea is to cut, shape, and form the hide into whatever object you desire. Belts are great beginner projects, as they take the least amount of time and skill to produce. But no matter what, you'll need to figure out stitching leather.

Sewing leather differs from cloth. Instead of piercing the material with a sharp needle, you punch the holes first. Then you follow with thread using a blunt needle. The punches differ depending on desired stitch patterns, but a common one is the "diamond stitching chisel." This tool looks like a small but heavy-duty fork. All you do is line it up, give it a few whacks with a hammer, and voila - neatly spaced holes ready for stitching.
Granted, mastering leatherwork like many arts takes years of practice and dedication. But you can get going and do some nice things in no more than an afternoon. Best of all, there are so many resources available to learn about leathercraft. YouTube is a great option, with many beginner tutorials out there worth watching (this is true for almost everything these days). I've tried leather myself, and I can tell you the leather crafting community is an excellent resource too. Reach out to someone who works with leather. I expect you'll meet an inclusive person excited to share their expertise.
Miniatures painting
Miniatures need no introduction for anyone who is into role-playing games (RPGs) like Dungeons & Dragons. These are the small (usually about one to two inches tall) figures used in staging these epic matches. While not all RPG enthusiasts get into painting "minis," many do, and it has become a pastime all itself. In fact, miniatures painting can be fun even if you're not into those sword and sorcery games at all.
To paint minis, you'll need various paints, small brushes, and a few figures to give it a try. All are easily had from your local games shop, craft store, or Amazon. And if you're like me, you'll also need some way to magnify the figures to see what the heck you're doing!

As for figures, I'd start with one of those bulk economy sets you can buy online. Painting minis will take some practice, so trying things out on a few beginner figures will be time well spent. Then, once you feel ready, go out and buy that expensive little Demogorgon you've always wanted.
Here’s a bit of a pro-tip. Although you can paint minis with almost anything, I recommend getting a set of good acrylics. The ones specific to the task will go on easier and make your work better from the start. Yes, they're expensive, with brands like Vallejo selling for five dollars or more for a 1/2 oz bottle (ouch). But remember - you're painting minis, not a house, so those little bottles go a long way. A good set of primary colors with a few washes and brushes will set you back less than fifty bucks.
Give miniatures painting a try - It's a great way to hone your detail-oriented patience.
Soldering
Yes, soldering - joining little tiny gizmos using a hot tool and some malleable metal. Commonly used in electronics, soldering methods connect various components to form electronic circuits. It sounds more like an industrial application than a hobbyist art. But soldering takes skill and practice to master. As such, it's an enjoyable and even therapeutic pastime (albeit with real-world application).
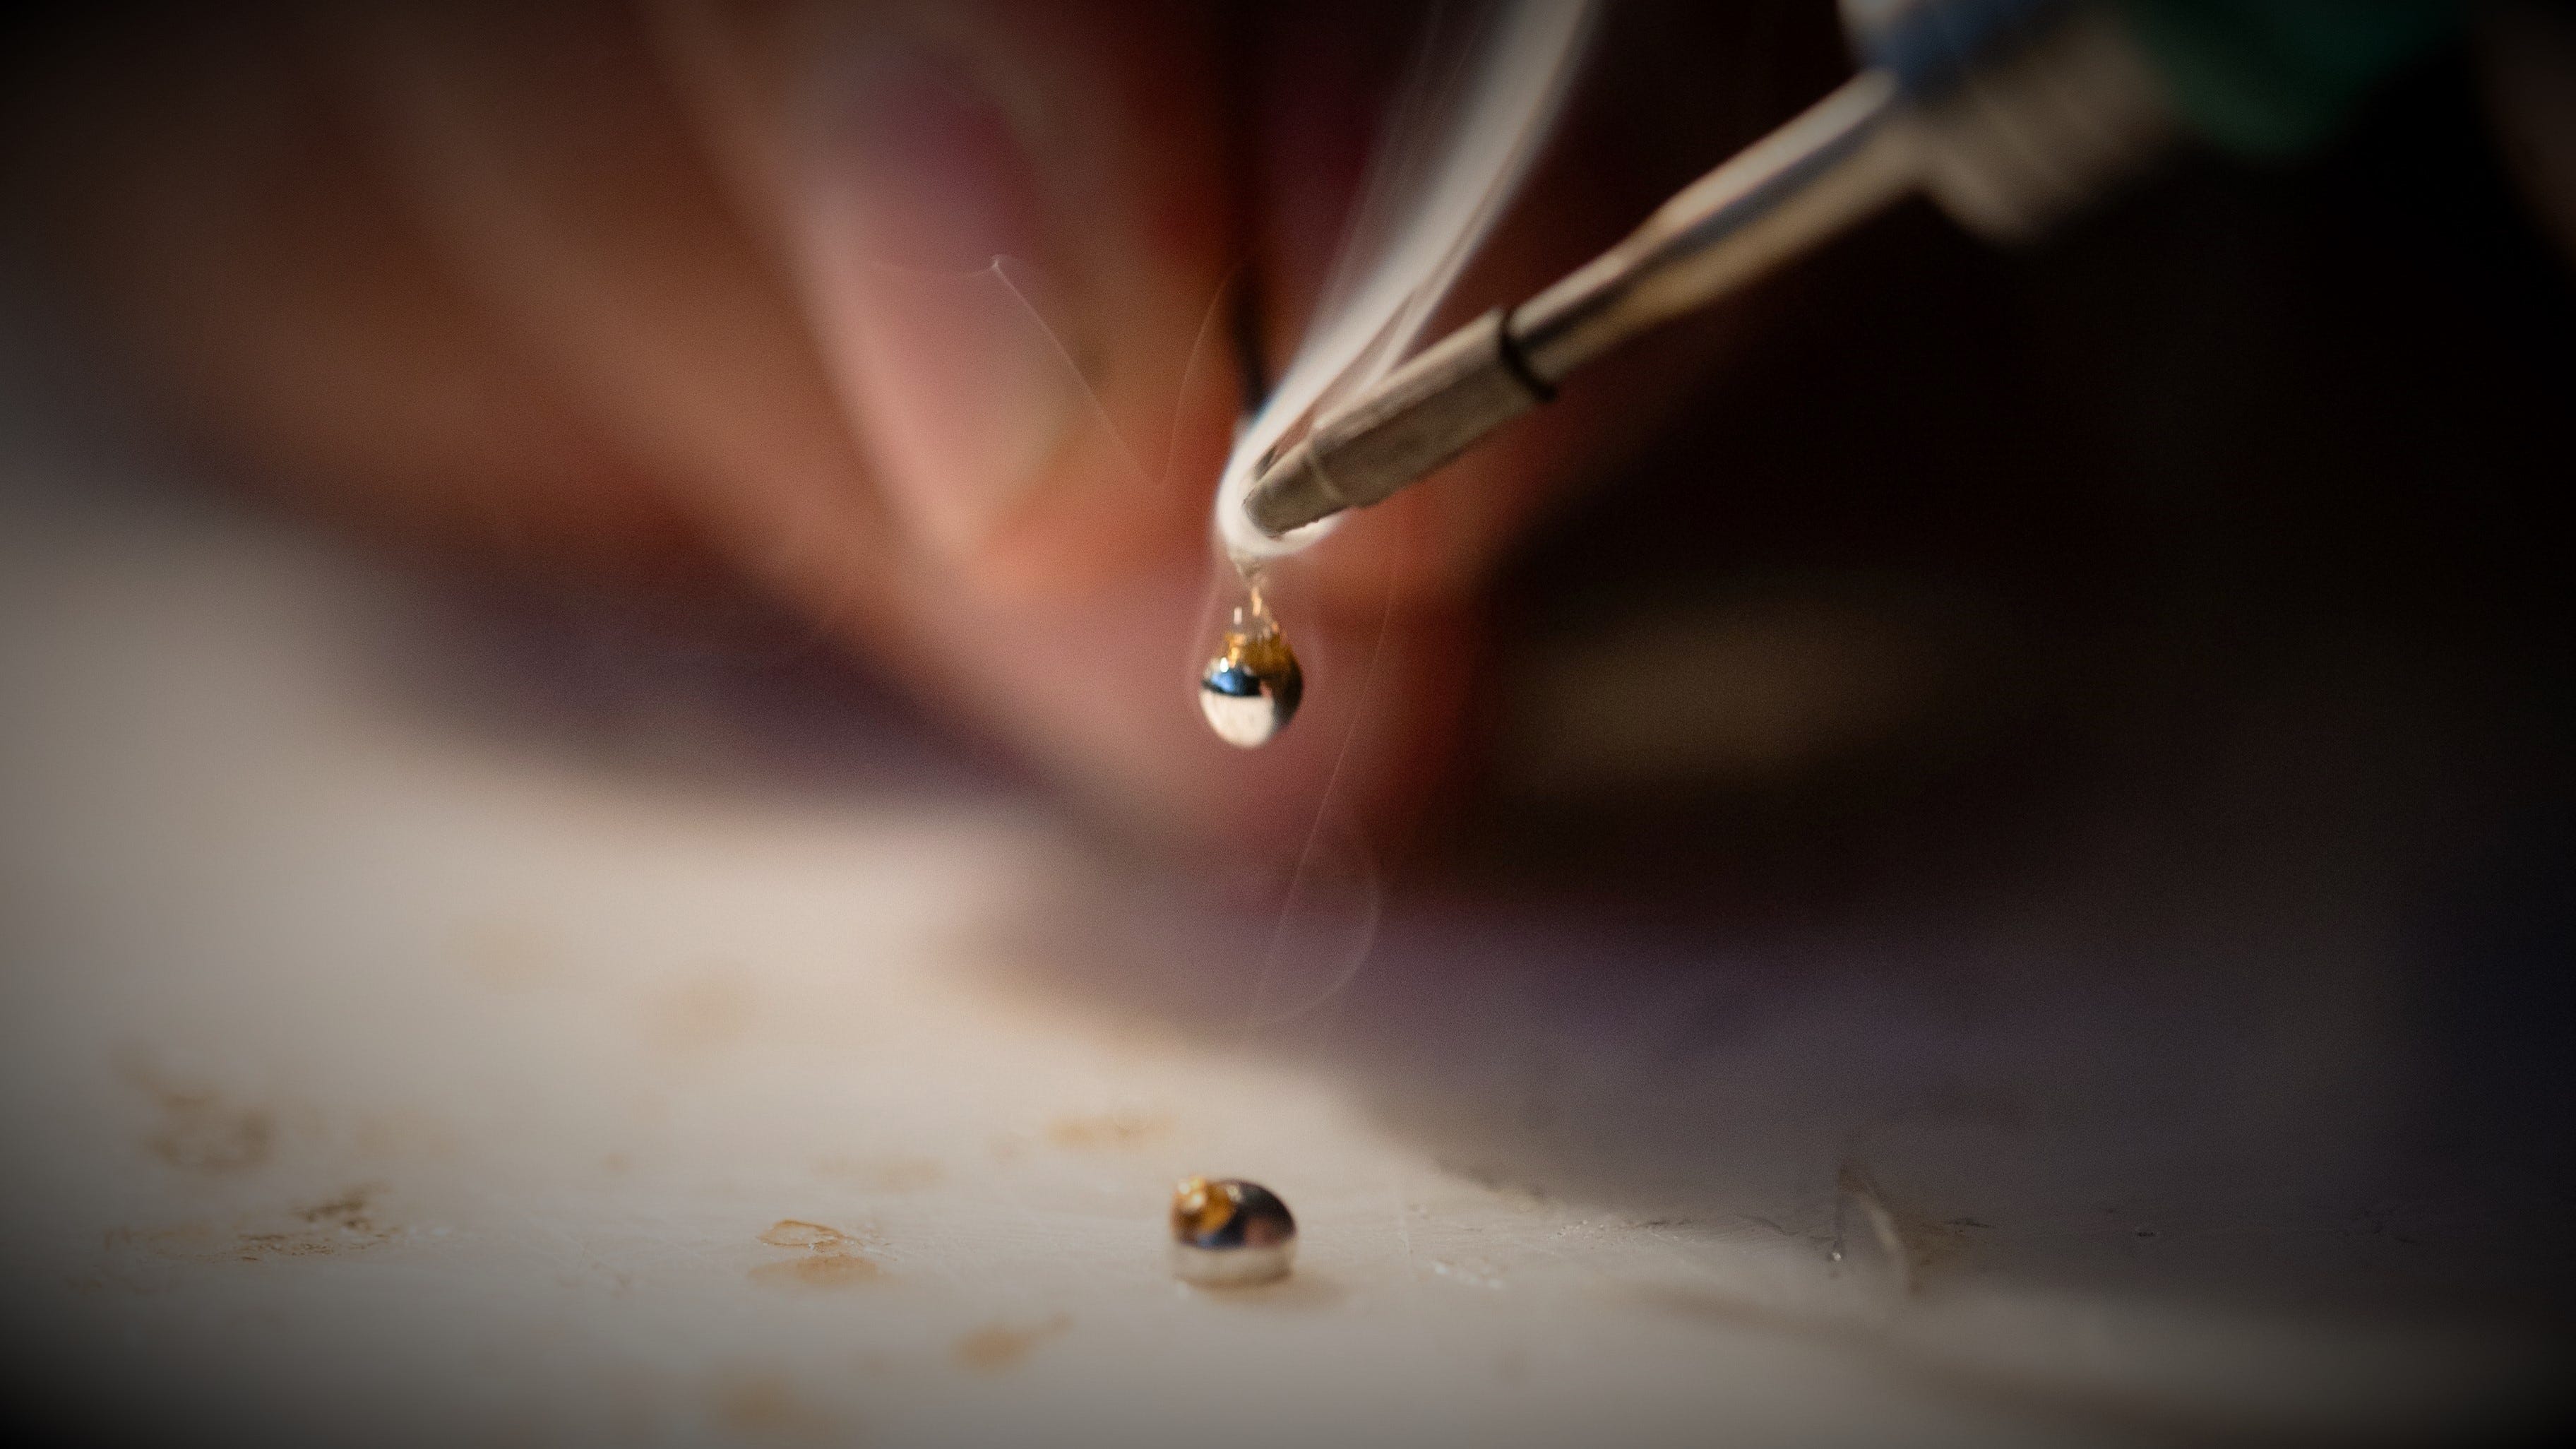
To begin soldering, you'll need a few specialized tools and materials. Alas, Radio Shack is all but dead. To get a good soldering iron, then, you'll most likely have to go online. Buy one with higher wattage (60 watts or so) so that it heats fast and stays hot. In recent years, these have improved, and you can find an excellent one for around sixty bucks. Also, source some quality silver solder. Don't use lead; it's terrible for you and the environment.
As for learning, watch a few videos, of course. And then jump in. Having a circuit in mind is nice but not required. Simply learning how to solder takes nothing more than an iron, some solder, and two pieces of wire. Trial and error is the name of the game. And once you get the hang of it, you'll want to explore making something that actually does something.
I'd say the best way to learn both soldering and electronic circuits is to pick up a kit and build it. They're inexpensive and have almost everything you'll need to start. A kit will force you to solder in a variety of ways, which is great. Plus, making something that functions at the end is a built-in "test" of how well you assembled things. If it lights up - good. If a puff of blue smoke rises up - bad! Either way and before long, you'll be branching into your own builds. Give it a try!
Wood carving
This one conjures an iconic image of an old man sitting on the front porch whittling a stick with his pocket knife. But carving wood takes on many forms and requires few or many tools, depending on how you do it. What I am suggesting here is power tool carving. Why? It's fun, gratifyingly fast, and easier to learn than using knives or chisels.

As for the carving tool of choice - get a Dremel Moto-Tool. These handheld rotary machines cost less than seventy bucks and have a variety of uses. If carving ends up not your thing, you'll still have an excellent new tool.
This little do-all machine, a Dremel makes short work of a block of wood. There are many Dremel accessories available for wood carving too. From roughing out the shape to making fine details, there's a bit for that. Same as with the tool, these accessories are inexpensive, and with a small variety in your kit, you'll be set to carve.
But what to carve? Any wood will work, but fine-grained light varieties like basswood are best. You can pick up carvable pieces at almost any hobby store. There are also plans and kits available. These step-by-step sets often instruct on carving recognizable things (animals, most commonly, for some reason). But I suggest getting your rotary tool and a wood block and simply going at it. Learning how each bit cuts through the wood is a big part of discovering this skill. So once you have practiced and then have a feel for it, go for that mom and cub bear carving you've always wanted to do.
A word of warning with woodcarving - this one makes a lot of dust, so wear a mask (and goggles). And consider doing it in a dedicated shop space or even outside. I experimented with this one back when I was a kid - in my bedroom. Dust was everywhere! Mom was a saint, helping clean my room and the whole house two, three, or more times a day.
Paper mache
The least expensive of these five (and perhaps of any hobby) is paper mache (also written as papier-mâché or paper mâché). It takes only flour, water, and newspaper to get started. This medium is a kid's project dream - safe and easy to use. Many of us tried our hand at paper mache while children, making masks using an inflated balloon. And then we never touched it again.
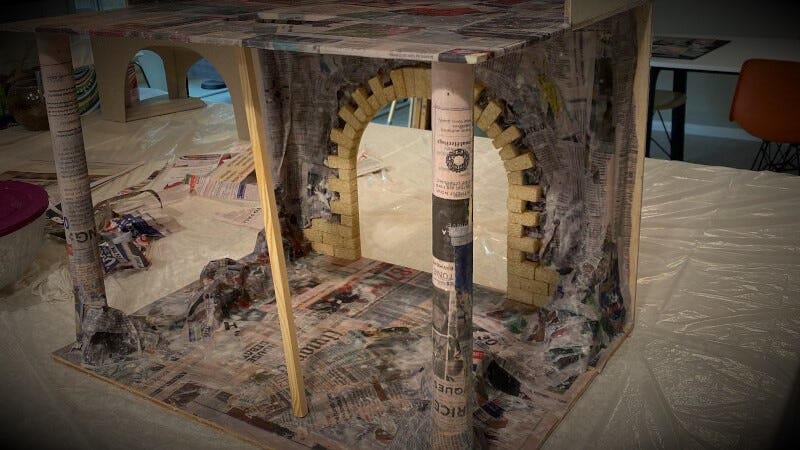
But paper mache deserves a second try. In the right hands, this benign medium takes on a diverse and artful array of applications. I've used the stuff to make pinatas. And I created a rather convincing diorama for Star Wars action figures with it too. One of the most surprising uses I've seen: a high school friend (his older brother, actually) made a dashboard for a VW Beetle using only paper mache!
The trick to using it well is the proper flour-to-water ratio - and layering. One to one, flour to water, makes the best paste. Briefly soak newsprint in this stuff, then apply long and thin strips at first. For best results, always use an underlying armature or foundational frame. Doing so makes the build go far better.
As your creation takes shape, apply more petite strips and patches. The more layers and in more directions, the stronger your outcome will be. Finally, mash the paper mache into a clay-like substance for molding. You can sculpt small and elaborate pieces this way.
It's incredible how detailed one can design with the stuff. But that's only half of it. Next, smooth the final surface using a medium-thin solution of flour water. It'll look like clay! Finally, paint your creation with whatever medium you wish. A paper mache sculpture can take on any shape and finish you desire.
There you have it, five very different maker hobbies that can be had on the cheap. Well, for less than a hundred bucks or so, anyway. With each and all, they're easy to begin. Simply tool up and get started.
If you do, a surprising outcome might be that your current hobbies change and grow. Imagine - maybe you'll create a paper mache mannequin for a sweater you're knitting. Or solder up a backlighting system for your latest bookcase build. Heck, you might start something else new - after you start something new. Perhaps you’ll paint up a few miniatures and then learn to build a glass display case for your handiwork!
Whatever it is, try something new. And then make something great.
Until next time.
JRC
Do conventional leather working tools work with vegan leather as well? There’s been an ongoing shift to this new material over the past few years, and even my car seats are now made of it. Functionally it seems equal or better, and cleaning/maintenance is much easier. The biggest downside is that it doesn’t have that real leather smell…but maybe the folks at Beyond Meat can come up with a high tech solution for that, too. :-)